Showing posts with label how to. Show all posts

Friday, January 17, 2020

Shirt Pillow - Upcycled Shirt Tutorial

My son, Dodge, loves sharks. He has a favorite shark shirt. He has outgrown it but he could not bear to give it away. Instead, we decided to make it into a pillow for his bed.


This is a fun project for lots of reasons. It reuses something you no longer need, it is super simple (just cutting, measuring, and sewing 4 straight seams), the buttons are used for the opening so you don't need to put in a zipper or buttons or Velcro, and the pocket from the shirt ends up on the pillow so you can use it.

Here's how you do it:

Difficulty: 🎔
Cost: ðŸŽ”

Materials needed:
Button-up shirt
Pillow form (or an old pillow you want to re-cover)
Thread

Use a button up shirt (with a pocket is the best), like this:


Start by making sure your pillow will fit on the shirt. It should fit between where the sleeves start and under the collar since this is where there aren't any curves in the shirt. You could also tuck the pillow into the shirt and do a test fit.


Now cut your shirt apart so you have flat pieces to work with. Cut off the sleeves and cut up the side seam. You will end up with the front, the back, and two sleeves, like this:


Now, measure your pillow. Measure from seam to seam each direction.


My pillow is 12" by 14".

Now add 1/2" inch to each of those measurements for the seam allowance. This means mine needs to be cut 12 1/2" by 14 1/2".


Start with the back of the shirt/pillow. Mark you cut lines on your fabric. I used chalk but you could use a pencil or a pen.


Cut on your lines. (You could use a rotary cutter if you have one; I did).


Now lay your back piece over the front piece. Fold it in half, and center it so the fold is in the middle of the buttons. This will make it so the buttons will be centered on your pillow. Make sure your pocket isn't going to be too high.


Here is a close up of the fold centered on the buttons:


 Now unfold it and trace around it.


 And cut it out. Now you have your front and back:


 Pin the front to the back, right sides together.


Stitch around the entire perimeter, using a 1/4" seam allowance. You don't need to leave an opening to turn it.

Pivot on the corners.

 It will look like this:

Now remove the pins and unbutton it.


Turn it right side out.


 Now press it. See what a difference the pressing makes? Here it is before pressing:


 And here it is after pressing it. It's worth it. Trust me.

 Now put your pillow form inside it and button it up:


You're done! It's a super cute pillow, a fun project, and a thoughtful way to reuse a favorite shirt.


Thursday, October 24, 2019

Simple DIY Trick or Treat Bag - Tutorial


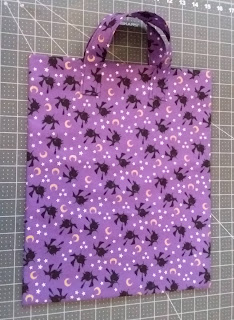
Kiki needed a matching bag for her costume so I made this simple trick-or-treat bag. It is fully lined with handles and just the right size for trick or treating. It's super easy to make and very inexpensive.

Here is what you need to make the bag:

1/2 yard fabric for outside of bag and handles
1/2 yard fabric for lining
matching thread

Difficulty: Easy
Cost: $


First, cut out your pieces.
For the outside cut a 17 1/2" x 26" rectangle
For the lining cut a 14" x 26" rectangle
For the handles cut (2) 14" x 3 1/2" rectangles

These are the pieces:


First we'll make the straps. Fold the strap right sides together, the long way. Pin.


Sew around the edge, leaving an opening on the side for turning.


Clip the corners.


Turn the straps right side out. Tuck in the seam allowance at the opening and press the straps flat. Top stitch along the long sides, about 1/8" from the edge.


Now we'll make the bag. Pin the lining to the outside of the bag, right sides together, along the 26" side and stitch.


Press it flat.


Press the seam allowance toward the lining.


Stitch on the lining, close to the edge. Make sure you stitch the seam allowance down as you sew.


Fold the bag in half the long way. Make sure you match the seam. Pin well. Stitch around the whole perimeter, leaving an opening at the bottom of the lining to turn it right side out.

Clip the corners. Turn the bag right side out. Press the outside of the bag. Don't worry about pressing the lining.


Tuck in the seam allowance at the opening and pin it shut. Stitch across the opening.


Stuff the lining into the outside of the bag, pushing the corners of the lining into corners of the bottom of the bag. The lining is slightly shorter than the outside of the bag. This creates a little rim around the top of the bag.


Press the bag flat.

Measure in 3 1/4" from the side and 2 1/4" from the top of the bag to position the straps. Pin well.


Stitch a small square on the bottom of the strap to attach it to the bag. Make sure you back stitch so it's really secure.


And you're done!


Wednesday, October 23, 2019

DIY Surgical Mask for Costume - Tutorial


Kiki wanted to be a surgeon for Halloween this year. It was easy enough to find her some scrubs and a stethoscope but she said she needed a surgical mask to complete her costume.

Here is a tutorial for a realistic looking play surgical mask. This is a one size fits all kind of mask; you just make the straps longer or shorter.


Here is what you will need:

Scrap of white flannel or cotton fabric, 5.5" by 6.75".
1/4" wide white double fold bias tape
White thread


First, cut out your 5 1/2" by 6 3/4" rectangle of white fabric:


To give your mask shape you are going to be pressing in some folds, kind of like accordion folds. Here is a chart with how to fold your mask:


First, using an erasable fabric pen, mark a line 3/4" from the top and 3/4" from the bottom. Mark a line every 3/8" between those lines. Now you will make the pleats in the mask. As marked on the chart, bring the line labeled A to the other line labeled A. Match B to B, C to C, and D to D.


Press each line with a hot iron to set the folds.

Pin the pleats to hold them in place.

Here is what it looks like from the side.


Now stitch across the narrow ends of the mask, like this:


Now cut a piece of bias tape just barely longer than the narrow end. Unfold the bias tape and pin it over the end of the mask, right sides together. Stitch on the fold closest to the edge.


Repeat for the other narrow side of the mask. 

Now trim the seam allowance a bit and fold the bias tape over the seam allowance. Pin well.


Top stitch along the edge of the bias tape. Repeat for the other side.


Trim the ends of the bias tape even with the edge of the mask. Cut two long pieces of bias tape, long enough to tie around the back of your head or around your ears. My mask ties around the ears.


Unfold the bias tape and pin it over the long edge of the mask, right sides together. Repeat for the other edge.

Stitch on the fold closest to the edge:


Now trim the seam and fold the bias tape over the seam allowance. Pin well.


Stitch from one end of the bias tape to the other.


Tie the ends together to fit around your ears or head. That's it! Your surgical mask is done!