Friday, October 25, 2019

Mickey Mouse Trick or Treat Bucket DIY - Tutorial

To complete Daffodil's Minnie Mouse Halloween costume she had to have a Mickey Mouse trick or treat bucket.


Here is a way to make a regular jack-o-lantern treat bucket into a super cute (and super cheap) Mickey Mouse or Minnie Mouse bucket.

This is a great dollar store craft and can be done for about $2.00, including the bucket!


Here is what you need:
A plastic jack-o-lantern bucket
1/8 yard or scraps of black fleece
Plastic canvas or empty milk jug


First, cut out 2 plastic circles to be the liners of the ears. This is what makes the ears stiff so they stand up by themselves. I cut mine with a 4 1/4" diameter. You can use plastic canvas or you can use the flat sides of a plastic milk jug. I have done it both ways and both work great.


Now fold your fleece so it is doubled. Pin your circles onto the fabric, leaving at least an inch between the circles.


Now you stitch around the circle, leaving a 2 inch opening so you can turn it right side out later. Stitch 1/4" away from the plastic. I like to just line up the left side of my sewing machine foot.


You should have something that looks like this:


Now cut out the circle, leaving about 1/4" outside the seam. I didn't trim the part by the opening.


Unpin the plastic circle from your ear and set it aside. Turn your ears right side out.


Now roll up your plastic circle in a nice tight tube.


Insert the tube into the opening of the ear.


Stuff it in there and unroll it so it's flat. The ears will look like this:


Tuck in the raw edges into the opening.


Now tuck the handle of the bucket into the opening between the layers of fleece.


Bring the fleece together and stitch it around the handle.


Tie the thread off so it's secure.


Repeat for the other ear and you're done!


The perfect trick or treat bucket for a little Minnie or Mickey Mouse!

 (If you want it to be Minnie you could add a bow).


Thursday, October 24, 2019

Simple DIY Trick or Treat Bag - Tutorial


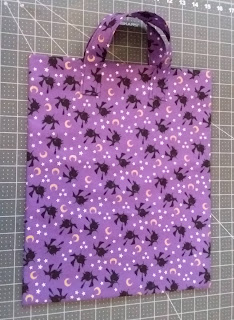
Kiki needed a matching bag for her costume so I made this simple trick-or-treat bag. It is fully lined with handles and just the right size for trick or treating. It's super easy to make and very inexpensive.

Here is what you need to make the bag:

1/2 yard fabric for outside of bag and handles
1/2 yard fabric for lining
matching thread

Difficulty: Easy
Cost: $


First, cut out your pieces.
For the outside cut a 17 1/2" x 26" rectangle
For the lining cut a 14" x 26" rectangle
For the handles cut (2) 14" x 3 1/2" rectangles

These are the pieces:


First we'll make the straps. Fold the strap right sides together, the long way. Pin.


Sew around the edge, leaving an opening on the side for turning.


Clip the corners.


Turn the straps right side out. Tuck in the seam allowance at the opening and press the straps flat. Top stitch along the long sides, about 1/8" from the edge.


Now we'll make the bag. Pin the lining to the outside of the bag, right sides together, along the 26" side and stitch.


Press it flat.


Press the seam allowance toward the lining.


Stitch on the lining, close to the edge. Make sure you stitch the seam allowance down as you sew.


Fold the bag in half the long way. Make sure you match the seam. Pin well. Stitch around the whole perimeter, leaving an opening at the bottom of the lining to turn it right side out.

Clip the corners. Turn the bag right side out. Press the outside of the bag. Don't worry about pressing the lining.


Tuck in the seam allowance at the opening and pin it shut. Stitch across the opening.


Stuff the lining into the outside of the bag, pushing the corners of the lining into corners of the bottom of the bag. The lining is slightly shorter than the outside of the bag. This creates a little rim around the top of the bag.


Press the bag flat.

Measure in 3 1/4" from the side and 2 1/4" from the top of the bag to position the straps. Pin well.


Stitch a small square on the bottom of the strap to attach it to the bag. Make sure you back stitch so it's really secure.


And you're done!


Wednesday, October 23, 2019

DIY Surgical Mask for Costume - Tutorial


Kiki wanted to be a surgeon for Halloween this year. It was easy enough to find her some scrubs and a stethoscope but she said she needed a surgical mask to complete her costume.

Here is a tutorial for a realistic looking play surgical mask. This is a one size fits all kind of mask; you just make the straps longer or shorter.


Here is what you will need:

Scrap of white flannel or cotton fabric, 5.5" by 6.75".
1/4" wide white double fold bias tape
White thread


First, cut out your 5 1/2" by 6 3/4" rectangle of white fabric:


To give your mask shape you are going to be pressing in some folds, kind of like accordion folds. Here is a chart with how to fold your mask:


First, using an erasable fabric pen, mark a line 3/4" from the top and 3/4" from the bottom. Mark a line every 3/8" between those lines. Now you will make the pleats in the mask. As marked on the chart, bring the line labeled A to the other line labeled A. Match B to B, C to C, and D to D.


Press each line with a hot iron to set the folds.

Pin the pleats to hold them in place.

Here is what it looks like from the side.


Now stitch across the narrow ends of the mask, like this:


Now cut a piece of bias tape just barely longer than the narrow end. Unfold the bias tape and pin it over the end of the mask, right sides together. Stitch on the fold closest to the edge.


Repeat for the other narrow side of the mask. 

Now trim the seam allowance a bit and fold the bias tape over the seam allowance. Pin well.


Top stitch along the edge of the bias tape. Repeat for the other side.


Trim the ends of the bias tape even with the edge of the mask. Cut two long pieces of bias tape, long enough to tie around the back of your head or around your ears. My mask ties around the ears.


Unfold the bias tape and pin it over the long edge of the mask, right sides together. Repeat for the other edge.

Stitch on the fold closest to the edge:


Now trim the seam and fold the bias tape over the seam allowance. Pin well.


Stitch from one end of the bias tape to the other.


Tie the ends together to fit around your ears or head. That's it! Your surgical mask is done!