Saturday, October 21, 2017

Doll Quilt


Every dolly needs a blanket!

Here is how to make a simple and cute doll quilt. It is 13.5 inches square when finished, the perfect size for dolly.
Difficulty: ❥❥
Cost: ❥❥


You will need:
❥ Fabric #1 (Back): 1/2 yard
❥ Fabric #2 (Borders): 6 "
❥ Fabric #3 (Stripe A): 1/8 yard
❥ Fabric #4 (Stripe B): 1/8 yard
❥ Batting: 15" by 15"
❥ Rick Rack: 2/3 yard

First cut out the pieces:

From fabric #1 cut out the back: 14" by 14" square.


From of fabric #2 cut the borders: (2) 2.5 inches by 10 inches and (2) 2.5 inches by 14 inches. (For my quilt I used the same fabric I used for the back but you can use a different fabric for the borders if you'd like).


From fabric #3 cut the 3 stripes: (1) 1.5 inches  by 11; (1) 2.5 inches by 11 inches, and (1) 3.5 inches by 11 inches.


From fabric #4 cut the other 2 stripes: (1) 2 inches by 11 inches and (1) 3 inches by 11 inches.


Cut the batting into a 15" by 15" square.

Cut (2) 11" pieces of rick rack.


First we will assemble the middle of the quilt.

Place the 2 smallest stripes right sides together and sew along one edge with a 1/4 inch seam allowance. Continue adding the stripes, smallest to largest, until all 5 stripes are sewn together like this:


Press. Sometimes I think ironing is a pain but it's really important when you are making a quilt. Look at the difference it makes from the picture above:


I have pressed the seams toward the pink because the blue is lighter and you would be able to see the seams through the fabric. Here is the view from the back:


Now trim the sewn edges. It's important things are nice and straight in a quilt like this and it can be hard to keep everything perfect when you are sewing strips together. There is about an inch extra so line it up on your rotary mat if you have one, measure and trim it to 10 inches by 10 inches.


Now we will add the rick rack. Position the rick rack on the two stripes and pin the ends.


Time to add the borders. Start with the shorter ones. Place them face down on the sides, making a rick rack sandwich. Sew across and press it open and it will look like this:


Now sew on the longer borders. Place them face down, sew, and press open.

Time to assemble your tiny quilt!

Lay down the batting then the quilt back, face up, then the quilt front, face down:


Sew all the way around the quilt, leaving an opening of about 3-4 inches.


Trim the batting so it is flush with the edge of the quilt and clip across the corners like this:


Turn the quilt right side out. Press. Fold the seam allowances in at the opening so it creates a straight edge that matches the rest of the edge:


Time to close up that hole. Pin it closed and then hand stitch it closed.


Now we pin through all the layers, all over the quilt, to hold it securely while we quilt it to hold all the layers together.


Now sew around the outline of the inside section. Stitch right where the 2 different pieces meet, which is called "stitching in the ditch."


Then along the sides of each stripe, and down the center of the rick rack. This stitching holds it all together and makes it puffy and adorable.


Here is a good example of stitching in the ditch. See how the stitching is straight and almost invisible?


After it's all quilted this is what the back will look like:


And here is the finished quilt:


Happy quilting!

❥Sugar

Wednesday, October 18, 2017

Doll Dress Tutorial

Now that you have your adorable rag doll, she will need some clothes!

Here is how to make a super simple, super cute dress. It's so simple you don't even need a pattern.

This method is great because you can use it to make dresses for any size of doll, just enlarge or shrink the pieces according to the size of the doll.

This is how you make the basic dress. You can also add lace or rick rack or ribbon or trim or pockets to make it even more fun!

Here is what you need to make a dress for your rag doll:

❥ Fabric - 5" by 12" per dress
❥ 1/8" wide elastic
❥ Small safety pin

Cut out your pieces:
(2)  3" by 6" rectangles
(1) 5" by 6" rectangle


Press in 1/4 inch on one side of each small rectangle and both sides of the large rectangle:


So they look like this:


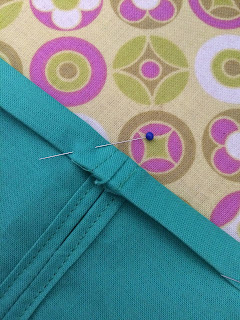
Pin the small rectangles to the large rectangle, right sides together, matching up the folds you just made. Put in a pin 1 1/4" down from the top and then 1" below that pin.


Sew from the top to the first pin and back stitch. Ddon't sew in the space between the pins. Starting at the second pin, back stitch then sew to the bottom, leaving an arm hole.


Open it flat and press the seams open.


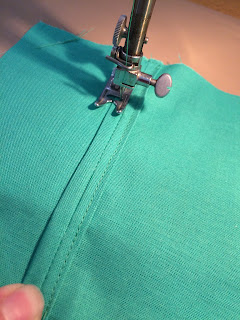
Stitch the seam flat along the edge of the each fold:


Now it looks like this:


Press up 1/4 inch from the bottom for the hem:


And stitch a 1/8 inch hem:


(Note: This would be the best time to add any ribbon or trim or lace or pockets, while the piece is still flat).

Fold down and press 1/8 inch from the top:


Then fold down, press, and pin 1/2 inch from there. This will be the casing for the elastic:


Sew 3/8 inch from the edge to make the casing:


Now we have to thread the elastic through. This is when you will use the safety pin. Poke the pin through the end of the elastic:


Close the safety pin and you have your little shuttle to thread the elastic through the casing.


Insert the safety pin into the casing and push it through to the other end. It will carry the elastic through for you.


Pull the pin out through the other end of the casing:


And pull the elastic tight so it gathers the top edge of the dress. Leave it wide enough that it will fit on your doll.


Pin the two ends of the elastic together and pin down the fabric toward the hem. Starting at the neck of the dress, stitch over the elastic and back stitch over it a couple of times to make sure it's very secure.


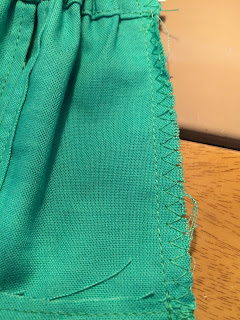
Trim the elastic so it's even with the edge of the seam. This will be the center back of the dress. Zigzag down the seam if you'd like. This just helps the seam not to ravel.


Turn the it right side out and your dress is finished!


Happy sewing!


Rag Doll


Two of my nieces have their birthday this month and I wanted to make them a fun present. Here it is: an adorable Rag Doll.

Difficulty: ❥❥❥
Cost: ❥❥

You will need:
❥ Fleece for the hair - 1/8 yard
❥ Cotton fabric for the body - 1/4 yard
❥ Stuffing/Fiberfil
❥ Thread
❥ Tissue paper 


Here are the printable patterns, one for the body and one for the hair. Click on the links below:


Print the pattern and cut out the pieces. Lay them out on the fabric. The hair pieces are made from fleece and the doll's body and head and arms and legs are made of cotton. I used a nice quality muslin. 

Cut out the pieces.


Trace the hair texture patterns on to the tissue paper. Set aside.


First we will assemble the body. Use a 1/4 inch seam allowance unless otherwise specified.

Arms/Legs: Put the pieces right sides together and sew around, leaving the end of the arm/leg open. Be sure to back stitch at each end so your stitching doesn't come undone when you turn them right side out. A short stitch will help you make nice curves.


Clip the curves almost to the stitching but not though the stitching.  


Turn right side out and stuff with Fiberfil. Leave about half an inch unstuffed at the openings to make them easier to pin and stitch through.


Body: Place the front body piece face up. Lay the completed arms and legs on the body, matching them to the markings on the body pattern, crossing them like this: 


Pin them securely in place. 

Baste them on using a 1/8 inch seam allowance. 


Place the back body piece on top, face down, making an arm and leg sandwich. (It seems crazy but when you turn it it will work. Like magic).


Stitch from the neck down each side, stopping at the bottom. 

Turn the body right side up, carefully pulling the arms, then the legs out the bottom opening. Top stitch on the body where the arms are attached.

Tuck in the seam allowance of the back of the body in place and pin. Stitch across the bottom with a 1/8 inch seam allowance. Make sure to back stitch.


Stuff the body.

Hair/Head: There are a few extra steps to this but it gives the hair texture and it's adorable. 

Place the corresponding tissue paper pattern on the back of each of the pieces of fleece, matching up the outline of the piece. Pin in place. Stitch through the inside lines on the tissue to create texture in the hair. 


Tear the tissue away and trim the threads. It doesn't matter too much if you can't get every bit of tissue paper off because it will be inside the head. (But do more than I did in the photo).


Pin the front hair piece in place on the front of the head and the back hair piece in place on the back of the head. Stitch the hair down along the bottom edge of the hair, about 1/8" from the edge.


Place the head pieces right sides together. Stitch from the dot at the neck all the way around to the other dot, leaving and opening for the neck. Clip around the curves and corners. Turn and pull through the neck opening. Stuff the head.


Attach the body by slipping the neck into the neck opening. You can stitch through all the layers with your machine or you can hand stitch around it.


Your dolly is done!

Now to give her a face, hair bows, clothes, blankets...

Happy creating!

-Sugar❥