Here is how to make a super simple, super cute dress. It's so simple you don't even need a pattern.
This method is great because you can use it to make dresses for any size of doll, just enlarge or shrink the pieces according to the size of the doll.
This is how you make the basic dress. You can also add lace or rick rack or ribbon or trim or pockets to make it even more fun!
Here is what you need to make a dress for your rag doll:
❥ Fabric - 5" by 12" per dress
❥ 1/8" wide elastic
❥ Small safety pin
Cut out your pieces:
(2) 3" by 6" rectangles
(1) 5" by 6" rectangle

Press in 1/4 inch on one side of each small rectangle and both sides of the large rectangle:

So they look like this:

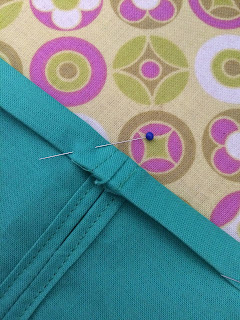
Pin the small rectangles to the large rectangle, right sides together, matching up the folds you just made. Put in a pin 1 1/4" down from the top and then 1" below that pin.

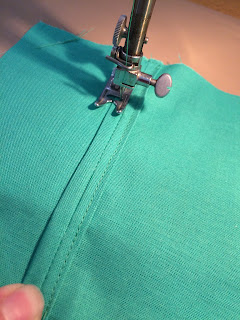
Sew from the top to the first pin and back stitch. Ddon't sew in the space between the pins. Starting at the second pin, back stitch then sew to the bottom, leaving an arm hole.

Open it flat and press the seams open.

Stitch the seam flat along the edge of the each fold:
Now it looks like this:

Press up 1/4 inch from the bottom for the hem:

And stitch a 1/8 inch hem:

(Note: This would be the best time to add any ribbon or trim or lace or pockets, while the piece is still flat).
Fold down and press 1/8 inch from the top:

Then fold down, press, and pin 1/2 inch from there. This will be the casing for the elastic:
Sew 3/8 inch from the edge to make the casing:

Now we have to thread the elastic through. This is when you will use the safety pin. Poke the pin through the end of the elastic:

Close the safety pin and you have your little shuttle to thread the elastic through the casing.

Insert the safety pin into the casing and push it through to the other end. It will carry the elastic through for you.

Pull the pin out through the other end of the casing:

And pull the elastic tight so it gathers the top edge of the dress. Leave it wide enough that it will fit on your doll.

Pin the two ends of the elastic together and pin down the fabric toward the hem. Starting at the neck of the dress, stitch over the elastic and back stitch over it a couple of times to make sure it's very secure.


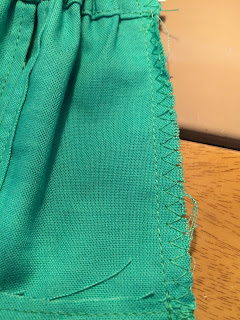
Trim the elastic so it's even with the edge of the seam. This will be the center back of the dress. Zigzag down the seam if you'd like. This just helps the seam not to ravel.
Turn the it right side out and your dress is finished!

Happy sewing!
Cut out your pieces:
(2) 3" by 6" rectangles
(1) 5" by 6" rectangle


So they look like this:

Pin the small rectangles to the large rectangle, right sides together, matching up the folds you just made. Put in a pin 1 1/4" down from the top and then 1" below that pin.

Sew from the top to the first pin and back stitch. Ddon't sew in the space between the pins. Starting at the second pin, back stitch then sew to the bottom, leaving an arm hole.

Open it flat and press the seams open.

Stitch the seam flat along the edge of the each fold:

Now it looks like this:

Press up 1/4 inch from the bottom for the hem:

And stitch a 1/8 inch hem:

(Note: This would be the best time to add any ribbon or trim or lace or pockets, while the piece is still flat).
Fold down and press 1/8 inch from the top:

Then fold down, press, and pin 1/2 inch from there. This will be the casing for the elastic:

Sew 3/8 inch from the edge to make the casing:

Now we have to thread the elastic through. This is when you will use the safety pin. Poke the pin through the end of the elastic:

Close the safety pin and you have your little shuttle to thread the elastic through the casing.

Insert the safety pin into the casing and push it through to the other end. It will carry the elastic through for you.

Pull the pin out through the other end of the casing:

And pull the elastic tight so it gathers the top edge of the dress. Leave it wide enough that it will fit on your doll.

Pin the two ends of the elastic together and pin down the fabric toward the hem. Starting at the neck of the dress, stitch over the elastic and back stitch over it a couple of times to make sure it's very secure.


Trim the elastic so it's even with the edge of the seam. This will be the center back of the dress. Zigzag down the seam if you'd like. This just helps the seam not to ravel.

Turn the it right side out and your dress is finished!

Happy sewing!
No comments:
Post a Comment